Using WET for Web
testing
Using
WET for Web testing 1
1
Introduction 3
2
Why Wet? 3
3
History and Evolution 3
4
Philosophy of WET 4
4.1 Philosophy
explained: 6
5
Features / Components of WET 7
5
Testing process using WET 9
5.1 Plan and
Organize tests 11
5.2 Use
simulated browser to identify objects and create skeleton scripts
11
5.3 Create the
basic test definition file 12
5.4 Complete the
scripting using the WET API 12
5.5 Enhance and
modularize scripts 12
5.6 Enhance the
test definition files 12
5.7 Execute
tests, analyze results and fix issues 13
6
Conclusion 13
1 Introduction
WET
started off as add-on to
the Watir Framework and is now a complete Web testing tool by itself
although it still uses Watir as the library. WET provides many
enhanced features and functions on top of Watir. WET classes
inherit from Watir and therefore adds features without removing
support for any of the existing feature.The
features offered by WET
in a nutshell are:
Bring
down test development effort by providing various UI based utilities
Excellent
extensibility through powerful scripting ability
Object
depot for good script maintainability
Object
identification using multiple parameters.
'Test
definitions' for robust test management
Slick
HTML results
Integrated
checkpoints support
Integrated
Datatable support
Reliable
popup handling
2 Why Wet?
WET
is an opensource alternative to commercial and proprietory web
testing tools. While WET provides you the freedom that comes built
into opensource applications, it retains and in some cases surpasses
all the features required by a web automation testing tool. WET was
created by a team of expert testers who understand the needs of the
testing community. As a result WET comes bundled with some very
powerful capabilities that are required for a successful test
automation project. WET uses the Proxied UI mechanism to create
initial scripts, a concept that allows one to create test scripts
with the same ease as in test recorders, but leaves out the issues
that come bundled with recorders Finally, Commercial support for WET
is available through Thwameva Technologies, which allows your
enterprise to buy you peace of mind, while still enjoying all the
benefits of opensource.
3 History and Evolution
WET
started off as a small extension library for Watir – Watir
Extension Toolkit.
It has come a long way and is now bundled with many compelling
features. As the codebase of WET has grown multiple times, it now
uses Watir just as the library to drive IE. WET not only offers you
all that Watir offers but many more powerful features to help make
your test automation effort a success.
With
the increased features bundled into the code base, we no longer refer
to WET as Watir Extension Toolkit. It is simply called as WET
WET's
first release, 0.5 was made to the opensource community on 8th
August 2005. In its first release, WET added a few features like
Object repository (now rechristened as Object Depot), integrated data
table support and slick HTML results. Besides this, WET retained the
same philosophy as Watir – perform operations on an IE browser
programmatically. WET provided a set of classes which was an
extension of the Watir classes. These classes were exposed to the
tester as the WET API. A tester could use all the classes from the
Watir API directly as WET was nothing else but an extension of Watir
On
October 2nd 2006, the final release of WET 0.9.8 was made.
The WET 0.9.8 was a major improvement over the previous version. The
philosophy of WET itself had a major shakeup with the introduction of
the WET UI. Besides this, WET now started using Watir as a library
rather than extending the classes, thus allowing WET to pack a lot
more power in its hood.
In
Mid 2007, WET 1.0 will be released (as of this writing which is on
the 27th of May 2007, 1.0 is in its alpha stage) which
again has some significant improvements when compared to verison
0.9.8 which will be covered in detail in subsequent sections and in
various user guides. One of the most significant change in 1.0 when
compared to 0.9.8 was to create new utilities which were meant to
demythify a certain wrong message that we sent in WET
0.9.8. The WET UI was created to make certain parts of test
development easier – for example, identification of objects and
creation of the object depot. However thanks to the WET UI was trying
to make things a bit more simpler than it should have – it
started giving rise to the belief that the WET UI can be used to
create end to end test automation scripts. Nothing can be farther
from the truth. Test automation is a serious development like
activity which requires its own skills and expertise. In WET 1.0
we have made an effort to correct this misconception by
disintegrating the WET UI into different applications. To create WET
Test suites, the tester can use the WET UI to identify html objects
on the web page being tested, creating the object depot and creating
the script skeletons. For the rest of the test automation activity,
the tester has to hand-hold most of the activities.
4 Philosophy of WET
The
use of test recorders in automation, is a concept that, of late has
been advocated against by experts. Instead, they advice the use of
scripting tests from the ground up. While recorders offer you a
faster development time, scripting allows you to take full control of
the application that you are trying to test. The latter obviously is
a lot more tedious and time-consuming. WET allows you to take
advantage of the best of both worlds.
The
following illustration will help understand the limitations of
recorders, strength of scripting and the advanatage of using WET.
There are two broadly used techniques of creating test automation
scripts – a) Record / playback and b) pure scripted. WET takes
a middle approach between these taking advantage of the best that
each of the technique offers:
1. Recorders:
Create scripts by
'reverse mapping' events back to actions - being a 'guessing
technique', not too accurate
Guess about how
to identify objects.
In
cases where recorders have scripting abilities, usually the scripts
generated by the recorder cannot be used if you switch to the 'the
scripting way'
2.
Scripting :
3.
WET UI :
Perform test
steps on the simulated browser (aka Proxied UI). No guesses –
results in more accurate scripts when compared to recorders –
These steps help in a) Identifying objects, b) creating the object
repository and c) creating place holder scripts.
Powerful
scripting ability unlike most recorder based tools. Using the place
holder scripts generated in the previous step, a tester can take
full advantage of the powerful API that WET offers to develop full
fledged test automation scripts.
Experts can
extend tests to any level. Can step out of the typical UI automation
and acheive a end to end system test
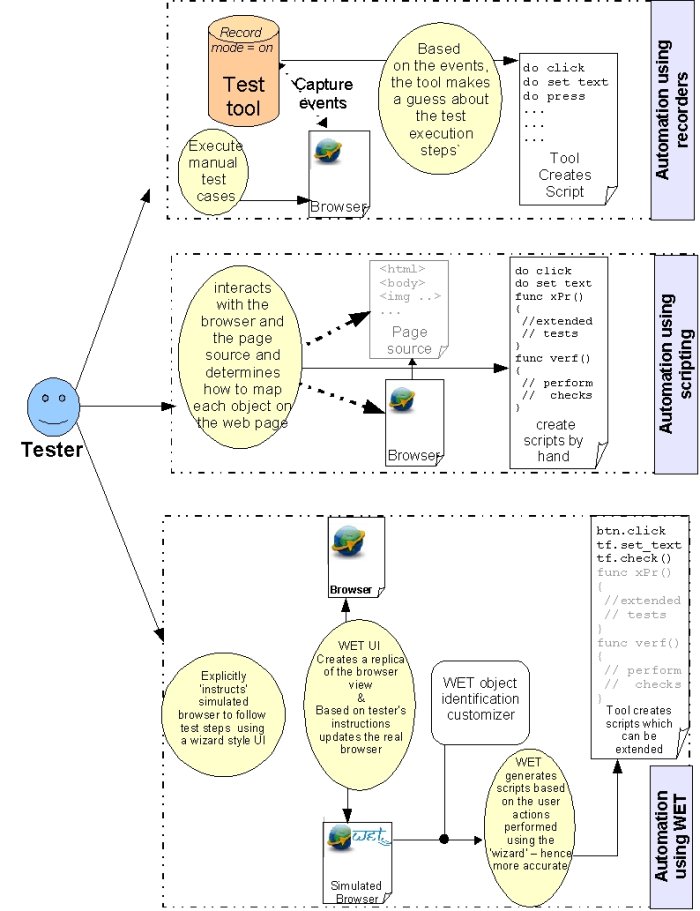
Illustration
1: The various techniques used in test automation
4.1 Philosophy
explained:
To understand the
benefits and limitations of each process, let's see each one of them
in detail:
Recorders:
Design
your test cases
Turn
the 'record' mode of the test automation tool to ON.
Start
executing the test cases manually
The
tool makes a guess about the object and the operation performed on
the object (and wrong guesses always prove costly!) based on the
events that have occurred on these objects. The tool then converts
these to test scripts.
These
scripts can later on be played back.
There are inherent
problems that are associated with this technique. To name a few:
During
the process of recording, if the tester makes a mistake and even if
(s)he corrects it later, these are also recorded as a part of the
script.
Recorders
can only make a guess about the events that were fired –
it can never accurately determine the root cause action that
triggered off this event. Consider this –
You have a web
page with a button and a textfield.
Whenever the button is
clicked, the texfield's value is changed to a specific text. Let us
say that this is achieved by the code firing another 'text_changed'
event whenever the button is clicked. What happens when you click on
the button? The test recorder records two events – one for the
original click and the second one that changes the textfield as two
separate actions of the test. In reality there was only action
performed – which was to click on the button!
Pure
scripted :
To
avoid problems seen in recorders, experts advice to totally throw
away recorders and use a pure scripted solution from the scratch.
Although this is a great technique, it can become extremely tedious
to do some of the preliminary tasks like mapping all the test
objects. If this has to be done by the tester, then one would have to
go into the source of the page (assuming AUT is a web application),
identify each tag and then map them to some mnemonic name. Clearly
this is a very tedious process.
WET
UI's technique :
The
WET Script assistant utility offers an innovative solution that lies
somewhere in between. We call this as the 'proxied UI'
technique. Please note that this is not the same as test
recorders that use a http proxy to record the http messages
being sent to and from the system under test. WET is a true
enduser simulation testing tool and does not use http as the
testing mechanism. The script assistant UI comes with the convenience
of records, while it overcomes some of their limitations. Using this
technique, a skeleton of the scripts is created by executing
the manual tests on a simulated browser. The simulated browser is a
UI application that is similar to a web browser in its look and feel
but works differently. Using this simulated browser you can connect
to an IE browser that is already running on your system and recreate
the view of the IE browser. The tester can then instruct this
simulated browser to perform various operations – which is
converted to test scripts. For example, imagine the same web page as
the one discussed previously –
A page with a button and
a textfield.
On the browser page, you
can actually 'enter text' in the textfield and 'click' the button.
On the simulated browser
page, you cannot do these operations. However for each of the
elements (textfield / button), you have a context sensitive menu,
which has a list of menu items corresponding to the actual
operations that you can perform on the element. For example, a
textfield would have 'set', 'clear' and 'append' as the options
available. A button would have 'click' as its option.
You
use this context sensitive menu to perform the actual operation. For
example, if you want to click the button - right click on the button
object in the simulated browser view and choose 'click' from the
context menu items.
Based
on this input, the simulated browser in turn performs the actual
click operation on the real browser and at the same time generates
the script corresponding to this operation.
Observe
the fundamental difference between this technique and the
record-playback mechanism. In the record-playback mechanism, the
recorder, based on the events, assumes that certain
operations were performed and generates scripts accordingly. In the
'proxied UI' technique, the tester explicitly instructs which
operations are to be recorded. The second advantage – Using the
'proxied UI' technique, there is a 'review' stage between the 'actual
operation' and the 'intended operation'. The tester does not directly
perform operations on the simulated browser. Instead, the tester
first does a right-click and then chooses the operation. By virtue of
this, the scripts generated are far more accurate when compared to a
blind record-playback technique.
The
proxied UI allows you to perform only a limited set of basic web
operations like clicking links,
setting text etc., That is the reason that we call the scripts
generated by the proxied UI as skeleton scripts.
The tester has to extend these skeleton scripts by writing additonal
functionality using the WET API / ruby libraries to acheive complete
test automation. Right from the beginning of the creation of the WET
UI (and we still continue to ) , we would like to
emphasise that the scripts generated by the Wet script assistant are
NOT the final, ready to use automation suite. To achieve a
high degree of automation, you will have to take advantage of the
advanced abilities provided by WET and powerful scripting
abilities of Ruby. WET does not want to share the platform
with those vendors who make the claim that using a script generation
tool can instantly convert a novice user into a test automation
engineer. We only want to try and achieve these:
Bring
down the learning curve for a manual tester who wants to make a
career in software test automation
Bring
in the ability to allow a team composition with a mix of experienced
automation engineers with entry level automation engineers. While
the experienced engineers can concentrate on building frameworks,
support libraries and mentoring the team, the others can be using
the script assistant to generate the script skeletons / mapping UI
objects, integrating existing test libraries, preconditions /
teardowns with scripts, parameterizing tests using datatables and so
on.
To
summarize, WET is one of those tools which offers the convenience of
recorders, without compromising on the requirements of a true test
automation tool – the ability to take control of the
application by using a powerful scripting / programming ability.
5 Features / Components of WET
WET
can be broadly classified as consisting of two layers :
Wet Core :- This
is the engine
that drives automation using WET. The WET core is a library written
using the Ruby scripting library. Ruby is a powerful object oriented
scripting language and therefore WET itself has a great scripting
ability. The WET library can be used to drive an Internet Explorer
browser and perform various operations like clicking buttons, setting
text, etc. on the IE browser.
Wet UI: Various UI
utilities that assists the tester to create WET test suites. You may
call these utilities as the front end UI for the various features of
WET Core. The WET UI utilities have all been written using C#.
5.1 Wet Core
The
WET core layer is like the heart of WET with regard to test
automation. The core layer offers the following abilities:
API
to control a web browser : The WET API is a ruby library using
which various operations can be performed on an IE browser. For
example, you can set some text on a textfield, turn on selected
checkboxes, click buttons, etc., After this you can verify if the
resulting pages displayed are as expected. This is nothing else but
the same steps that you would be performing in a manual test
scenario.
Object
depot : When working with test
automation, you typically end up writing tens of thousands of lines
of test scripts. These scripts typically have operations that need to
be performed on various objects (eg. html) of the application under
test. Since many of these objects will be common across various pages
of this application, there is a great deal of repitition which
becomes a maintanance nightmare. To address this, WET uses an XML
based object repository, called Object depot. using the Object depot,
definitions about the different UI elements to be used in the
application under test are stored in a centralized XML file.
Integrated
Datatable support : There are many instances when the same test
scripts have to be run against different data. For example, the test
script to add 2 numbers will be the same but we may want to run it
against different types of numbers. This can be acheived in WET by
using the integrated support for Datatables that WET offers. Here,
data is organized as rows and columns – The columns
representing the fields and the rows representing the different
categories of data. WET has support for three types of datatables –
a) Excel data table – here WET can read directly from Excel
spreadsheets which follow a specified format for the rows / columns,
b) XMLdata table – In this case, the fields and categories are
defined in an XML file that follows the presecribed xml schema and c)
CSV Datatable – In this case the data is defined in a csv file
with a pre-defined format. This feature allows users who dont use
Microsoft Excel (eg. Openoffice users) to take advantage of
datatables.
Test
definitions : Test definition
is a unique feature of WET, thanks to which tests can be defined in a
robust manner. The test definition is a file which describes various
artifacts of the test like the name of the test, description, which
datatable file to use, which object depot file to use, how many
preconditions does the test have?, how many teardowns?, what are the
test steps of this test?, and so on. This allows a tester to define a
WET test in exactly the same way that manual test cases are written.
Slick
HTML Results : After WET tests have been completed, the results
that are displayed have complete information about the test and is in
HTML format. This allows the results to be shared with anybody –
even those who dont have WET installed.
5.2 Wet UI
The
WET UI is a collection of various UI utilities that assist the
creation of scripts. Typically, each of the UI utility works as a
front end for a corresponding WET core feature. The following are the
various components of the WET UI:
WET
Manager : As the name suggests, the WET manager is the control
panel for all other WET UI
applications. This control panel can be used to launch and manage
each of the WET UI applications
Simulated IE : A
proxied UI which looks just like an IE browser. Using this
application, you can connect to an open IE browser and simulate
various actions like button clicks. These actions are then performed
on the real browser. These actions are also used to a) identify
objects and generate the object depot file and b) generate WET script
lines corresponding to the actions performed.
WET Simulated Browser
: A proxied UI which has its own look and feel. Works just like
the simulated IE in terms of object identifcation / script line
generation but the view here is not same as the real IE browser.
Treeview browser : A
proxied UI in which the elements of the 'connected' IE are displayed
in the form of a treview. The treeview's hierarchy is the same as the
DOM of the actual page being shown. Just like the simulated IE, the
actions that are performed on the treeview are converted to object
depots and script lines.
Object
depot manager : The front-end UI for creating and managing object
depot files. Using the object depot manager, you can either create
object depots from the scratch or edit existing object depots.
Test definition editor
: The front-end UI to create and edit test definitions. Unlike
the previous version of WET(0.9.8), starting from version 1.0
onwards, the test definition editor is more of a 'dumb' editor. You
can only define values for various parameters using the test
definition editor. The underlying changes are not taken care of
automatically. For example, if you define a value for the
precondition and the precondition does not exist, then WET does not
try to create the precondition for you automatically.
Script Editor : A
basic editor to edit and create WET test scripts.
Dynamic configuration
editor : WET uses a configuration file to control certain
parameters. The values in the configuration file is the value that is
used as the default. However in some cases, it may be required to use
a value different from the default value. The dynamic configuration
editor allows you to do this. Again not all configuration parameters
can be changed – only a couple of parameters can be edited
using the dynamic configuration editor.
The above sections are a
brief overview about each of the WET components. Detailed description
about each of the above components can be found in individual user
guides.
5 Testing process using WET
The process of creating
test automation suites using WET is a multi stage process which
involves quite a few steps. To derive the best out of the powerful
abilities of WET, it is suggested at the minimum, that all the steps
mentioned below are followed. The section below is just an overview
of the steps required for creating WET test suites. Individual user
guides of different components will provide a more detailed
description of these steps.
The illustration below
gives a graphical overview of the steps involved in creating wet test
suites.
|

Illustration
2: Flowchart of the testing process using WET
|
5.1
Plan and Organize tests
As
in any activity, planning is a critical phase of test automation.
This should be your first step before starting any other activity.
The various aspects to consider while planning are:
What
are the various scenarios that you would be automating?
What
are the scenarios that would be reused often as preconditions or
teardowns?
Which
are the tests which would need different input data to be passed?
(to plan datatables)
How
many similar kinds of pages can be expected (to plan the number of
object depots)
Where
do you plan to save all the results?
and
more such things ...
Once
you have taken care of these planning items, then you will need to
come up with a folder structure to organize your entire test suite.
Organize your folders well helps a lot in making sure that tests run
more reliably. Although the folder structure that you choose entirely
depends on your application and your preferences, the following is a
suggestion (One that we use as the baseline for all our tests)
<wet_suite>/
tests/ (the
tests folder is where all the wet tests will be saved)
$test_name1--|
|-
test.defs
|-scripts-|
|-
$trans1.wet
|-
$trans2.wet
|-
....
|-
$transn.wet
|-results
|
|-
(test will
|
create results)
|-
data -|
|-
data.xls
$test_name2--
//Have same structure as above...
//and
you could have any number of tests like
//$test_name3,
etc.
libs/ (place
for precondition / teardown tests)
$lib_test1
--|- test.defs
|-scripts-|
|-
$trans1.wet
|-
$trans2.wet
repository/
(place for object depot)
$repo1.xml
$repo2.xml
ruby_libs/
(place for customized ruby libraries)
$lib1.rb
$lib2.rb
5.2
Use simulated browser to identify objects and create skeleton
scripts
Now that you have planned
the scenarios that have to be automated, you can start creating the
scripts skeleton and the object depot. The simulated browser helps in
both these activities. Although you are free to choose whichever
simulated browser suits you the most (Simulated IE, Wet Simulated
browser or Wet treeview), we recommend the usage of the Wet Treeview
as the most reliable one.
Once the script skeletons
and the object depot have been created, then save the scripts and the
object depot to the appropriate locations
|
Tips :
If you are planning
to use a common object depot file for various scripts, then you
should first open this object depot file and associate your
simulated browser with this object depot manager
In case you are
using the same object depot in most of your scenarios then
consider setting the object_depot parameter in the
WetUI.cfg:
[Startup]
object_depot=
<path_to_your_commonly_used_object_depot>
|
5.3
Create the basic test definition file
Using the test definition
editor, create the basic test definition file. In this basic test
definition file, the object definition path and the transaction
script have to be added. This will allow easy testing of the
developed scripts before enhancing the scripts further. After the
test scripts have been further enhanced and other modularizing
techniques applied, you'll have to come back and modify the test
definitions further to set the datatable path, add preconditons, add
teardowns and add additional transactions if required.
5.4
Complete the scripting using the WET API
As mentioned earlier,
scripts generated using the simulated browser can only be considered
to be a 'skeleton' or 'placeholder' scripts. This will not exploit
the full power of what WET has to offer. To exploit this, you will
have to enhance the scripts by hand using the WET API library
refrerence as a guide.
5.5
Enhance and modularize scripts
To increase the test
coverage and to improve the reliability of scripts, tests should be
modularized. The techniques used in this area are:
Parametrize tests and
use datatables :- The use of datatables allows the same test
script to be easily reused against multiple data inputs. These data
inputs are specified in either a excel datasheet, an xml file or in a
csv format. To allow a script to use datatables, these scripts must
be designed such that they can accept parameters.
Parametrize and
customize object depot :- WET's object depot has some pretty
powerful features. A couple of them are a) The attribute value can be
defined as a regular expression instead of a string literal. b) The
object depot itself can be parametrized – that is, can be
designed to accept parameters at run time. This feature is very handy
when you want to write scripts for those pages in which the elements
change at runtime based on the input passed. (For example, the number
of messages in the inbox depends on how many messages were
deposited). The simulated browser, while creating object depots
automatically, cannot take advantage of these advanced
features. This customization has to be done manually by the tester.
Write specialized ruby
libraries :- WET is written in ruby, which is a full-fledged
Object oriented scripting language. A tester can write specialized
libraries using Ruby and plug them into the Wet test suite. These
ruby libraries are typically used to move beyond 'gui automation' so
that the test scripts can also verify other reactions (for ex.
checking database or checking the backend file system, etc.)
5.6
Enhance the test definition files
The test definitions
created in step 5.3 was a bare bones test definition which wasn't
taking the full advantage of the powerful features offered by WET.
After completing the test script enhancement and modularization of
object depot / parametrization, you should now go back and edit the
test definition so that these advanced features are harnessed. The
test definition enhancements that can be done are:
Set the datatable file
to be used.
Add preconditions and
teardowns to the tests, where applicable. Preconditions are the
steps to be followed to bring the system under test to a testable
state. For example, to run the test cases for messages in the inbox,
the user must have first logged in. 'log in' here is a precondition.
Likewise, as soon as the inbox test is completed, the user must log
out so that the system is back to its original state. 'logout' here
is a teardown. Note here that the login and logout steps are not
required just for the 'inbox test' but for many other test cases of
the email web ui. Therefore instead of repeating these steps in each
such test, they can be written as separate WET tests. These tests
then don the role of library tests. Such library tests can be used
as preconditions or teardowns in any other WET test. The test
definition editor provides an easy way to add preconditions or
teardowns
Add multiple
transactions to the test. Many a time, a test case consists of
multiple sub tests – each such sub test can be written as a
separate transaction. All such transactions can then be added to the
test definition. The Test definition editor provides a simple way of
adding multiple transactions.
5.7
Execute tests, analyze results and fix issues
Test automation is just
like any development activity. The final step, therefore, would be to
execute the developed test scripts and run them against the
application under test. After running these tests, analyze the
results and based on the results either fix issues, if any, or if
required, make enhancements to the tests.
6 Conclusion
This user guide provides
an insight into WET and the process of test automation using WET.
This is not supposed to be a detailed guide for web testing using
WET. For a more detailed explanation about each of the features,
refer to the individual user guide for that feature.
|
WET is a opensource automated web testing tool which uses Watir as the library to drive web pages. WET drives an IE Browser
directly and so the automated testing done using WET is equivalent to how a user would drive the web pages. WET extends the
scripting abilities of Watir and also offers the convenience of recorders. It is licensed under LGPL and BSD style open source licenses.
|
|